
What can you see? For research purposes, several variants of the Müller-Lyer illusion have been developed (see Girgus, Coren &Horowitz, 1973). Instead of the arrows, they were replaced by other symbols. This results in the following collection in the program: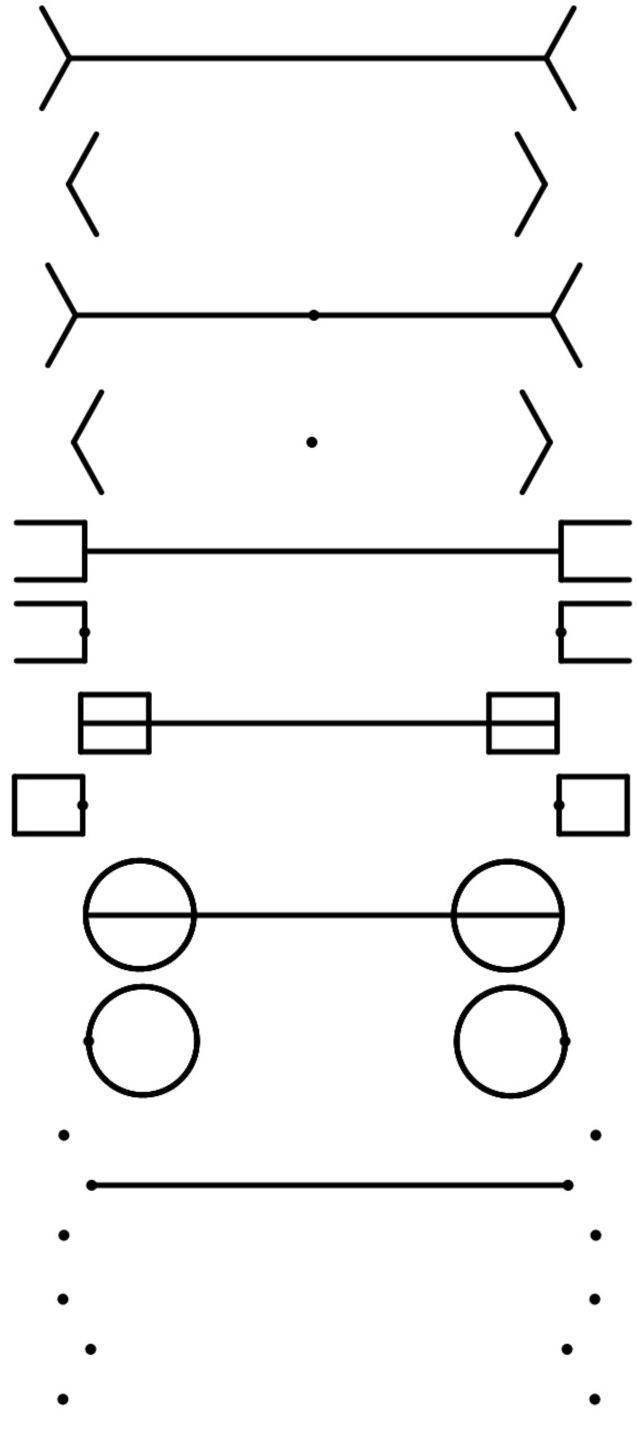
- arrow (Müller-Lyer original)
- arrow, no line (Brentano form)
- point (Judd form)
- point, no line (Judd variant)
- square wing form
- square wing, no line
- square
- square, no line
- circle (Delboeuf form)
- circle, no line (Delboeuf variant)
- points (Coren form)
- points, no line (Coren variant)
What can you do? Again all parameters can be changed in the program. With ML_form you can choose between the the mentioned Müller-Lyer variants. So you can reproduce the images above. You can change the length of lines and arrows (line_length, size_symbol), their thickness (line_thickness) and the distance between the three lines (gap). The angle or the form of the symbols is determined by delta_symbol. The reduction of the distance to zero (gap = 0) is in all cases proof that the three lines are always of the same length! In addition, you can play with colors (color_bg for the background, color_line for the line and the symbols). Probably you will perceive the effect differently with the different symbols.
Note: If you switch between variants, you may have to reset the parameters in order to create a meaningful configuration.
The big Müller-Lyer laboratory: You can measure how well you or your visitors can estimate the distances. The lab contains the twelve variants mentioned above, determined by ML_form. I recommend to provide first the variables with the desired values. For the actual measurement the symbol in the middle follows your mouse. Whenever you think that the two sections to the left and right of this symbol are exactly the same length, i.e. that the moving symbol is at the center of the line, press the [space bar]. Then the position of the symbol is fixed and you get the deviation from the exact midpoint in pixels as well as in %. You can start a new measurement by pressing the green flag.
A note to the program code: If you analyze the program code, you will notice that the main program is surprisingly compact. This is because in Snap! you can collect the calls of the procedures that draw the different symbols and graphic elements in lists. It is then sufficient to access the list element for the selected Müller-Lyer variant. A very elegant solution!
Related topics: Müller-Lyer illusion
References:
Girgus, J., Coren, S. & Horowitz,L (1973). Peripheral and central components in variants of the Mueller-Lyer illusion. Perception & Psychophysics 1, 157-160. Available as download.